Setting up Outlook Web Access (OWA) two-factor authentication
General information
This article describes how to configure Outlook Web Access (OWA) for remote mail access on an Exchange server with two-factor authentication.
Possible authentication methods:
MultiFactor mobile applicationSMSBiometricsHardware OTP tokensOTP applications: Google Authenticator or Yandex.KeyTelegram
If you are using ADFS to access OWA, go to ADFS Configuration Instructions.
Video presentation
Possibilities
- Protect access with a second factor of authentication at every login and after a configurable period of time.
- Self-adjustment of the second factor by the user upon first login.
- Selectively enable second factor based on group membership in Active Directory.
- Access log.
Scheme of work
- The user opens the Outlook Web Access site;
- OWA requests the first authentication factor: login and password, checks the correctness of the specified data and creates a user session;
- The MultiFactor.IIS.Adapter component checks that the session is authorized and redirects the user to the second authentication factor;
- After successfully completing the second factor, the user returns to the OWA website and continues working.
To configure the second factor of authentication, you will need to install and configure the MultiFactor.IIS.Adapter component on the Exchange server. The component is developed and supported by Multifactor and is distributed free of charge along with the source code. The current version is on GitHub: code and assembly.
Please note the license. It does not give you the right to make changes to the source code of the Component or create derivative works based on it. The source code is provided for informational purposes.
Installation requirements
- The component needs access to the host api.multifactor.kz via TCP port 443 (TLS) directly or through an HTTP proxy;
- Outlook Web Access must work with a valid SSL certificate.
- The server must be set to the correct time.
Setting up Multifactor
- Go to Multifactor management system, then to the "Resources" section and create a new Outlook Web Access site;
Setting up OWA
-
Copy the file
Bin\MultiFactor.IIS.Adapter.dllto the directoryC:\Program Files\Microsoft\Exchange Server\V15\ClientAccess\Owa\Bin; -
Copy the file
mfa.aspxto theC:\Program Files\Microsoft\Exchange Server\V15\ClientAccess\Owadirectory; -
Edit the file
C:\Program Files\Microsoft\Exchange Server\V15\ClientAccess\Owa\web.config:- make a backup first
- add a component to the
<modules>section as the first line
<add type="MultiFactor.IIS.Adapter.Owa.Module, MultiFactor.IIS.Adapter" name="MFA" />- add component parameters to the
<appSettings>section
<add key="multifactor:api-url" value="https://api.multifactor.kz" />
<add key="multifactor:api-key" value="API Key from Multifactor settings" />
<add key="multifactor:api-secret" value="API Secret from Multifactor settings" />- save and close.
-
To selectively request a second factor based on Active Directory group membership, add parameters to the configuration
<add key="multifactor:active-directory-2fa-group" value="owa-2fa" />
<add key="multifactor:active-directory-2fa-group-membership-cache-timeout" value="15"/>- the first parameter is the name of the group in AD from which you want to request the second factor. A group can be nested, that is, it can contain other groups;
- the second parameter is the time period (in minutes) after which information about the user’s membership in the group is updated. To optimize performance, the default value is 15 minutes (but can be set to 0).
-
To work with the Multifactor API via HTTP Proxy, add the parameter to the configuration
<add key="multifactor:api-proxy" value="http://proxy:3128" />
reCAPTCHA OWA
If you have not made any changes to the OWA login page (adjusting colors, fonts, icons or other modification), then follow the instructions at replacing the login page. Otherwise, see section updating login page.
Replacing the login page
- Select the captcha to connect. These instructions offer three options to choose from: Yandex SmartCaptcha, Google reCAPTCHA v2 and Google reCAPTCHA v3.
- Create a pair of keys (client\site key and server\secret key) in your personal account for the selected captcha, indicate the correct domain on which the captcha is installed:
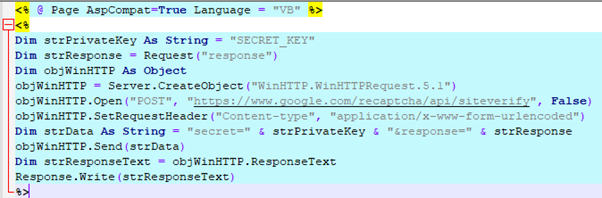
- Edit the recaptcha.aspx file in the appropriate archive directory, adding your secret key:
- Copy the recaptcha.aspx file to the OWA directory: C:\Program Files\Microsoft\Exchange Server\V15\FrontEnd\HttpProxy\owa\auth
- Make a backup of the logon.aspx file from the directory C:\Program Files\Microsoft\Exchange Server\V15\FrontEnd\HttpProxy\owa\auth
- Edit the logon.aspx file in the appropriate archive directory. To do this, find the phrase “SITE_KEY” and replace all occurrences of it with your key.
- Replace the logon.aspx file in the C:\Program Files\Microsoft\Exchange Server\V15\FrontEnd\HttpProxy\owa\auth directory with the logon.aspx file with your key. A restart of Microsoft Exchange Server is not required.
- IMPORTANT. Installing Microsoft Exchange Server updates may result in the logon.aspx page being overwritten and recaptcha.aspx being deleted.
Updating the login page
Follow steps 1-5 of the instructions above. INSTEAD of clause 6. follow these steps: Make changes to the file: C:\Program Files\Microsoft\Exchange Server\V15\FrontEnd\HttpProxy\owa\auth\logon.aspx
Find the markup
<form action="/owa/auth.owa"
and replace it with
<form action=" "
Find the markup
<div onclick="clkLgn()"
and replace it with
<div onclick="recaptchaClkLgn()"
Find the markup
<div><input id="passwordText"
and on the next line
paste the code (after replacing all occurrences of the SITE_KEY key): a) to connect Yandex SmartCaptcha
<script type="text/javascript">
            function recaptchaClkLgn()
            {
            var oReq = new XMLHttpRequest();
            var sResponse = document.getElementsByName("smart-token")[0].value;
            var sData = "response=" + sResponse;
            oReq.open("GET", "/owa/auth/recaptcha.aspx?" + sData, false);
            oReq.send(sData);
            if (oReq.responseText.indexOf("ok") != -1)
            {
                document.forms[0].action = "/owa/auth.owa";
                clkLgn();
            }
            else
            {
            alert("Invalid CAPTCHA response");
            }
            }
            </script>
<script src="https://smartcaptcha.yandexcloud.net/captcha.js" async defer></script>
<div class="smart-captcha" data-sitekey="SITE_KEY"></div>
b) to connect Google reCAPTCHA v2
<script type="text/javascript">
            function recaptchaClkLgn()
            {
            var oReq = new XMLHttpRequest();
            var sResponse = document.getElementById("g-recaptcha-response").value;
            var sData = "response=" + sResponse;
            oReq.open("GET", "/owa/auth/recaptcha.aspx?" + sData, false);
            oReq.send(sData);
            if (oReq.responseText.indexOf("true") != -1)
            {
                oReq.open("GET", "/owa/auth/mfa.aspx?" + sData, false);
                document.forms[0].action = "/owa/auth.owa";
                clkLgn();
            }
            else
            {
            alert("Invalid CAPTCHA response");
            }
            }
            </script>
    <script src="https://www.google.com/recaptcha/api.js" async defer></script>
    <div class="g-recaptcha" data-sitekey="SITE_KEY"></div>
c) to connect Google reCAPTCHA v3
<script src="https://www.google.com/recaptcha/api.js?render=SITE_KEY"></script>
    <script type="text/javascript">
     function recaptchaClkLgn()
     {
     var oReq = new XMLHttpRequest();
     grecaptcha.ready(function() {
           grecaptcha.execute('SITE_KEY', {action: 'submit'}).then(function(token) {
              console.log("v3 Token: " + token);
               var sData = "response=" + token;
               oReq.open("GET", "/owa/auth/recaptcha.aspx?" + sData, false);
               oReq.send(sData);
               if (oReq.responseText.indexOf("true") != -1)
               {
                   oReq.open("GET", "/owa/auth/mfa.aspx?" + sData, false);
                   document.forms[0].action = "/owa/auth.owa";
                   clkLgn();
               }
               else
               {
                   alert("Invalid CAPTCHA response");
                }
            })
        });
      }
    </script>
After this, replace the logon.aspx file in the C:\Program Files\Microsoft\Exchange Server\V15\FrontEnd\HttpProxy\owa\auth directory with the modified logon.aspx file with your key. A restart of Microsoft Exchange Server is not required.
Installing Microsoft Exchange Server updates may result in the logon.aspx page being overwritten and recaptcha.aspx being deleted.
If it doesn't work
If you are testing the OWA second factor on a test server, the user's mailbox should be in a database mounted on the same server where the MFA settings are applied.
Additional Information
- The component must be installed on all servers in the cluster.
- The component works equally well with direct access to the IIS server and through a proxy, for example, nginx.
- The component does not affect the first authentication factor, namely checking the user's login and password.
- Two-factor verification connects to OWA. Work with ECP, MAPI and ActiveSync remains unchanged.
- The component re-queries the second factor after a configurable period of time and closes the sessions left by users. The time interval is configured in the group policy Multifactor management system.
Additional best practices for protecting Exchange
- Install all security updates in a timely manner;
- Close external access to ECP, EWS, MAPI, IMAP - all these protocols should only work from the internal network / VPN. Leave only OWA and ActiveSync;
- Protect access to OWA with a second factor;
- Set up ActiveSync device management using the self-service portal.
Questions and answers
Q: How to transfer UPN to Multifactor as a user login?
O: By default, the user login is transferred to Multifactor in the format in which the user enters it on the login page.
You can allow the user to enter a login in any format, but enable conversion of the login to UserPrincipalName (UPN) when sending an access request to Multifactor using the following setting:
<add key="multifactor:use-upn-as-identity" value="true"/>
See also: